Quick Start Checklist: What to Do After Installing Fynq
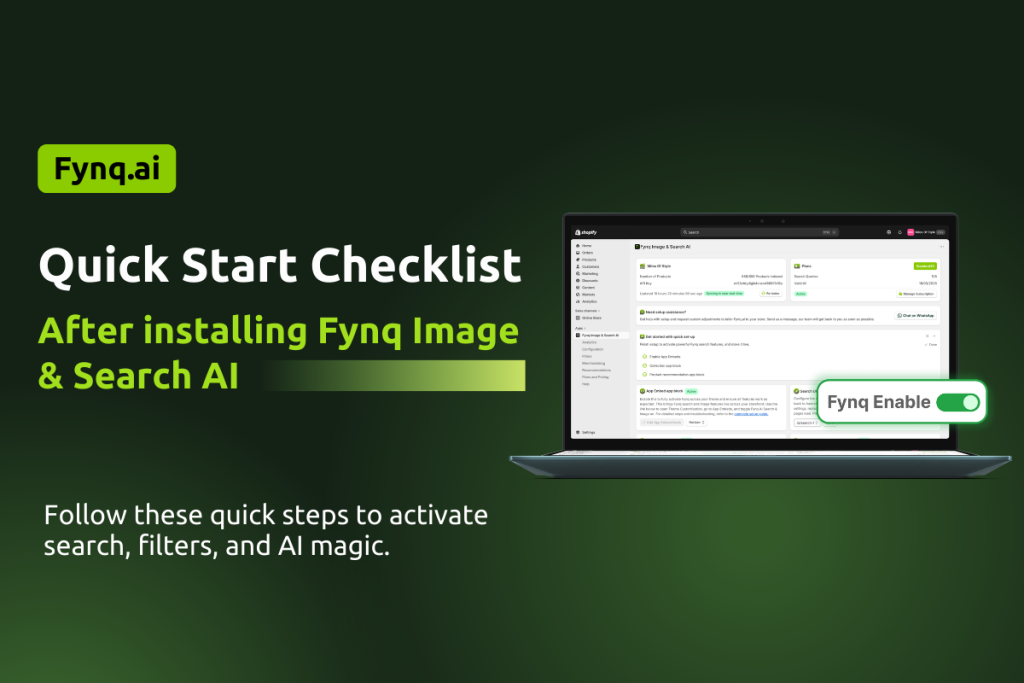
So, you’ve installed Fynq Image & Search AI on your Shopify store. That’s a great first step, but now what?
Installing the app is just the beginning. To see real improvements in your product discovery and search experience, you’ll need to take a few simple actions. This guide gives you a step-by-step checklist to help you set up Fynq’s AI-powered search, smart filters, and product recommendations properly without getting overwhelmed.
You don’t need any tech skills. Just follow this list, and you’ll be up and running with Fynq in no time.
Table of Content
Why the First Few Steps Matter
Fynq doesn’t just install and “run” in the background. It gives you tools to:
- Replace your basic Shopify search with intelligent results
- Add live product filters to your collections
- Create product labels and visual enhancements
- Show recommendations to increase conversions
But all of this starts with a clean setup.
Quick Start Checklist: 6 Things to Do Right Away
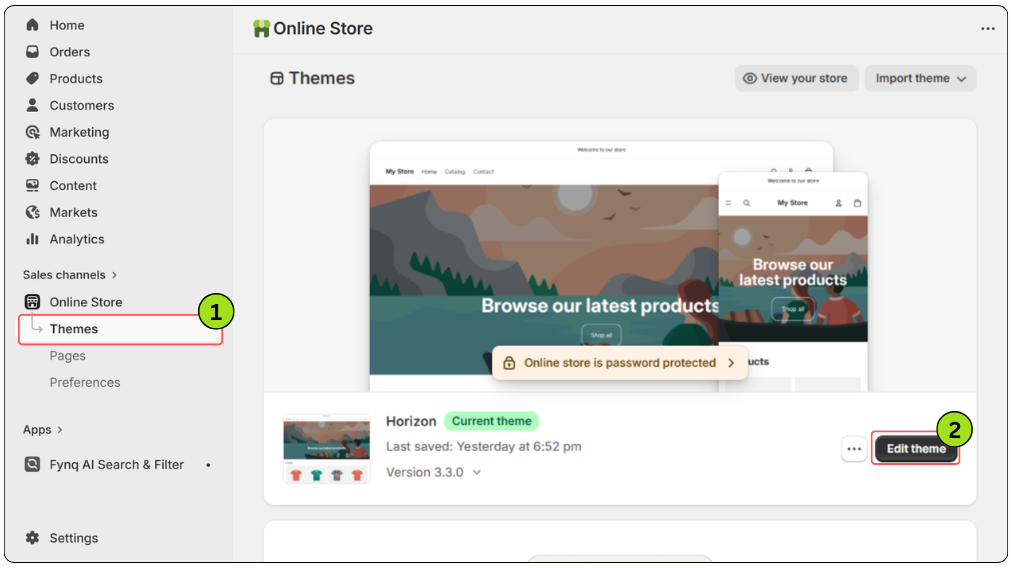
Before anything appears on your storefront, you need to enable Fynq through Shopify’s built-in app embed system. This step allows Fynq’s widgets, like Instant Search and filters, to actually show up on your live store.
Where to do it:
1. Enable the App Embed Block
- Go to Shopify Admin > Online Store > Themes > Customize > App Embeds > Fynq Image & Search AI > Click Save
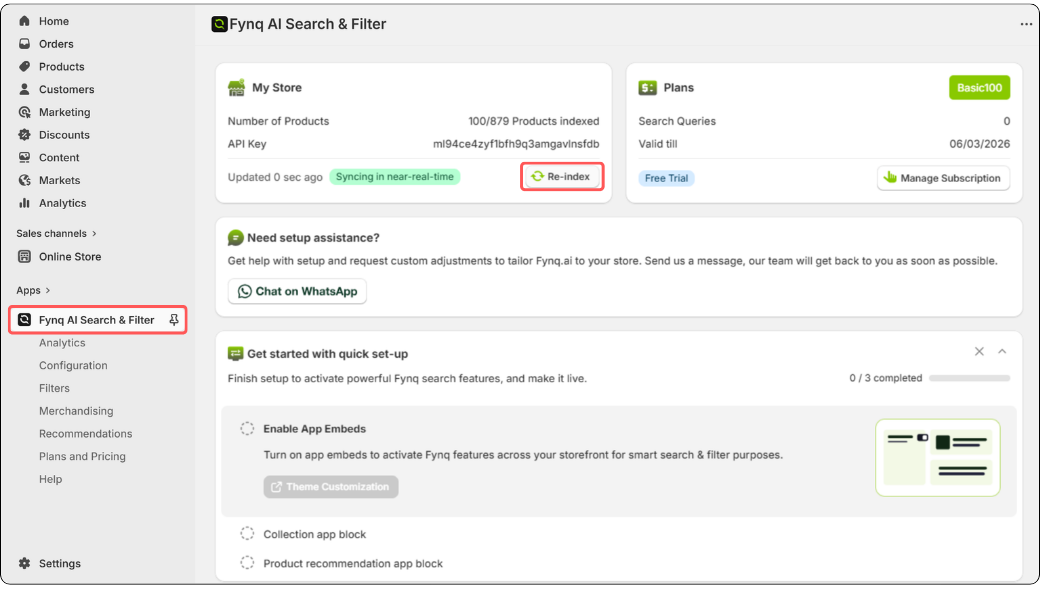
2. Let Fynq Sync Your Product Catalog
Once installed, Fynq begins collecting your store’s product information (provided your store already has products listed in the inventory, titles, tags, options, SKUs, collections, metafields, and more. This “sync” is the foundation that powers your search results, filters, and recommendations.
Why it matters: Without synced data, Fynq can’t display products correctly or return accurate search results.
Where to check it:
- Look for the sync status on the Fynq Dashboard.
- If needed, click Force Re-index to do it manually.
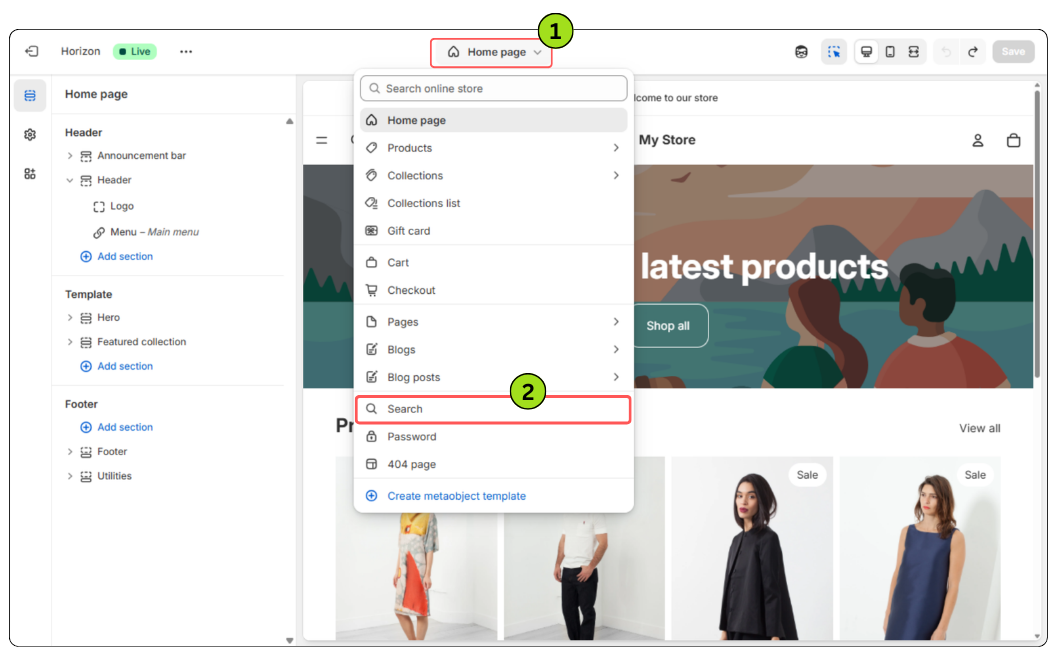
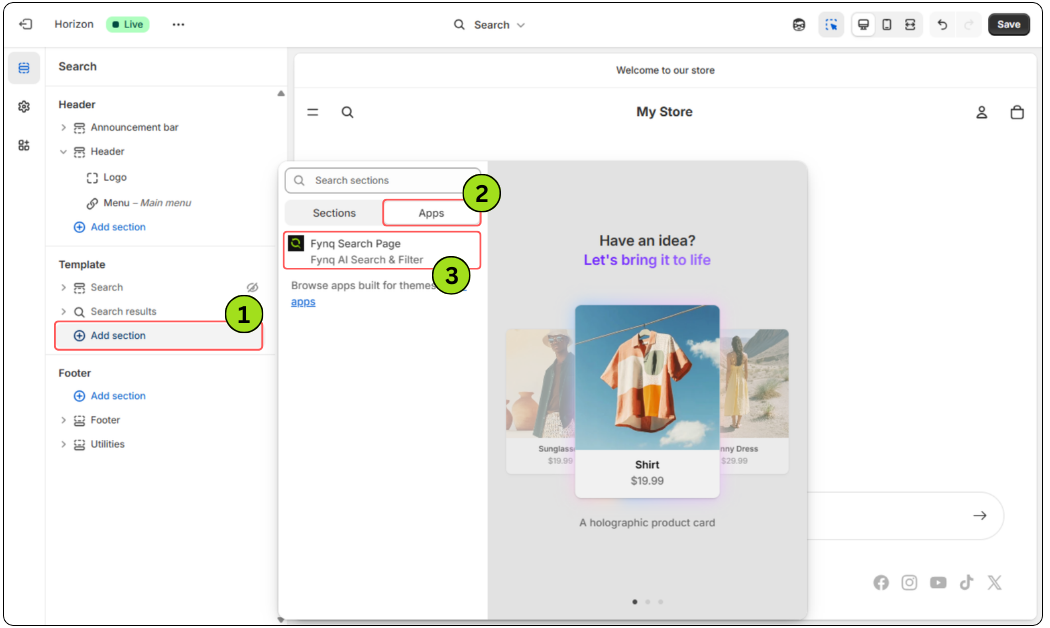
3. Connect Your Search Page URL
Your search page URL is the link Shopify uses when someone performs a search (yourstorename/search). Fynq needs to know this URL so it can take control of the search results and deliver a smarter experience.
Why it matters: If you skip this step, your customers might still see the old, basic Shopify search.
How to do it:
You can configure the Search Page URL from the Fynq dashboard by following these steps (if not already done):
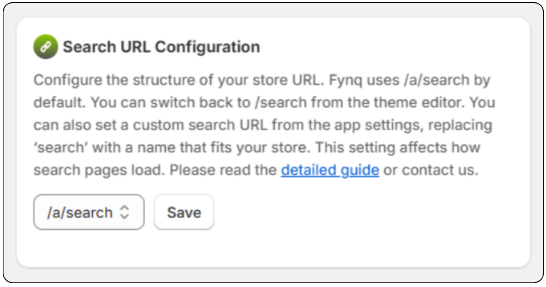
N.B: Please configure the search page URL carefully, as a tiny mistake or typo can break the entire storefront’s search behavior.
4. Preview the Instant Search Widget
The Instant Search Widget is Fynq’s signature feature. It shows real-time search results, suggestions, and filters while customers type without even hitting “Enter.”
Why it matters: It reduces bounce rates and helps users find products faster, especially on mobile.
Where to preview it:
- Go to Configuration > Instant Search Widget
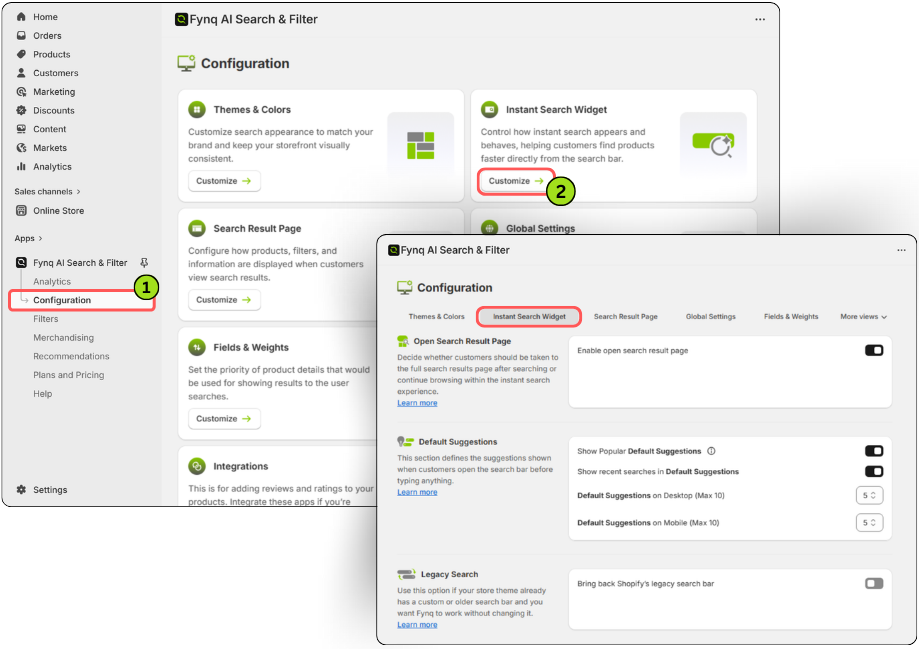
- Customize the options the way you expect them to behave in your storefront. For example, you can choose how many products you want to show instantly, enable showing price and other details about the products, and even search suggestions.
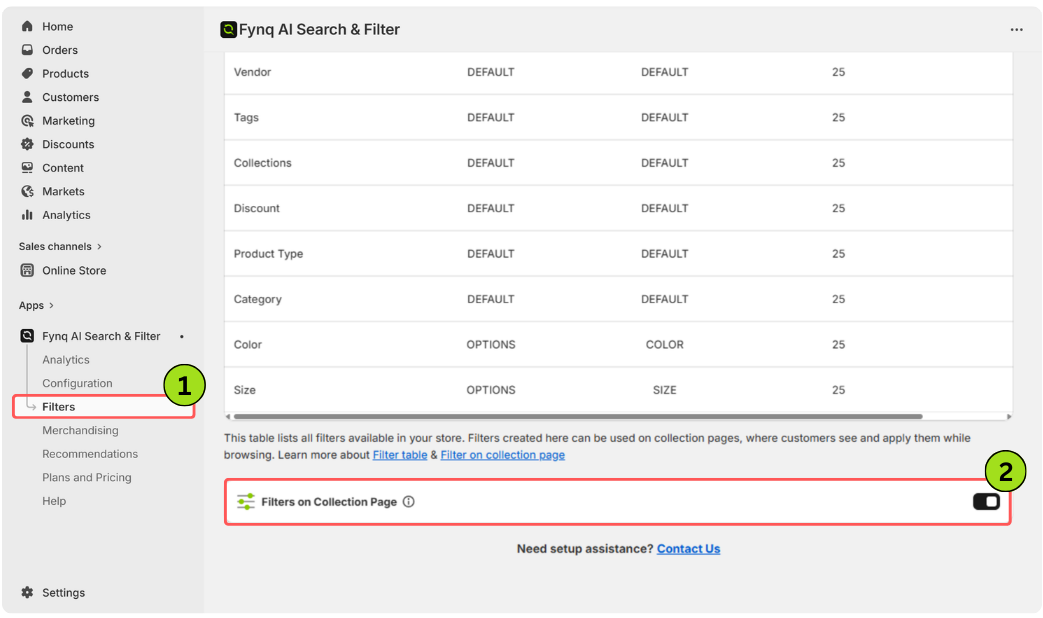
5. Test Basic Filters on Collection Pages
Fynq gives you full control over filters, but you don’t need to build everything at once. Start with one or two filters, for example, by size or color, and see how they look and work.
Why it matters: Filters help customers narrow results quickly, especially in stores with large catalogs.
Where to start:
- Go to Filters > Filter List
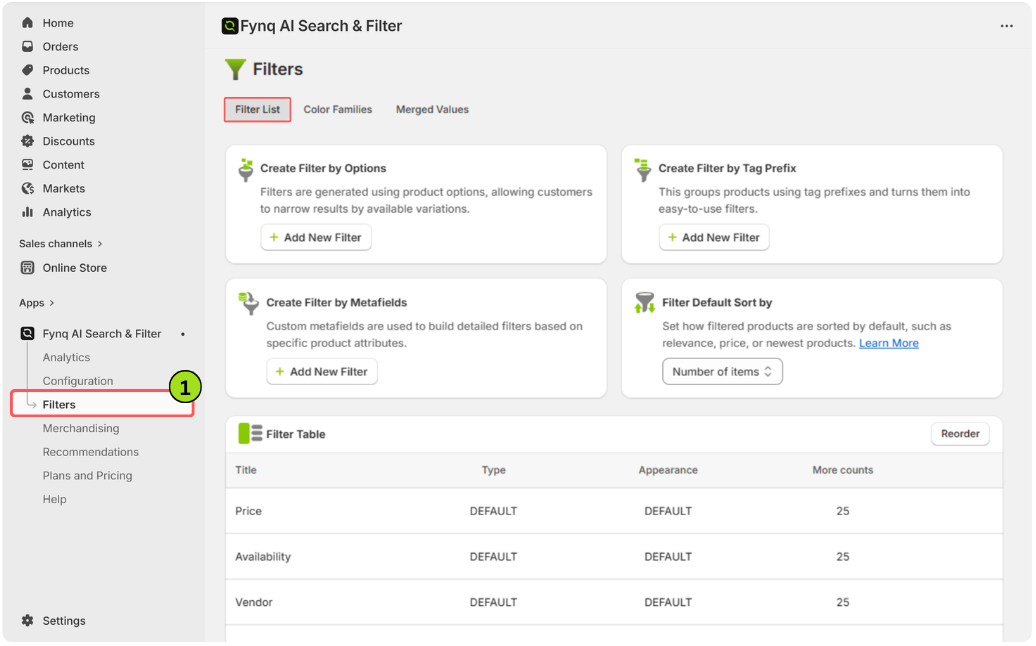
- Create your first filter based on product tags or options
- Enable Filters on the collection page
6. Check Your Current Plan
Before diving into advanced features, it’s smart to know what’s included in your plan. Each Fynq subscription level includes different limits, like the number of filters or access to analytics.
Why it matters: Understanding your plan helps avoid surprises and shows you when it’s time to upgrade.
Where to check it:
- Go to the Fynq Image & Search AI dashboard. Scroll down and find the section ‘Current Plan’.
- Otherwise, you can directly go to the ‘Plans and Pricing’ page, where you will be able to see your current plan status and also have knowledge about upgrading according to your business growth.
Final Thoughts: Start Small, Grow Confidently
You don’t need to customize everything at once. Fynq is designed to grow with your store. Just by completing this quick setup checklist, your customers will already have a smarter, faster, and more helpful search experience. Once your filters are live and the Instant Search Widget is running, you’ll start to see the difference right away.
Next up: Let’s get your Search Page URL configured the right way, so Fynq takes over search properly.