How To Set Up Filters by Product Variants Like Size or Color?
Filters like size, color, or style are what shoppers actually use to narrow down their search. If someone’s looking for a “Large Blue T-Shirt,” they don’t want to scroll through every product; they want to click, filter, and find fast. This is where product option filters become a game-changer.
In Fynq, you can build these filters using the product options already available in your Shopify catalog. It’s simple to set up and even easier to manage.
Where to Find This Setting
You’ll start from:
Fynq Image & Search AI → Filters → Filter List → Create Filter by Options
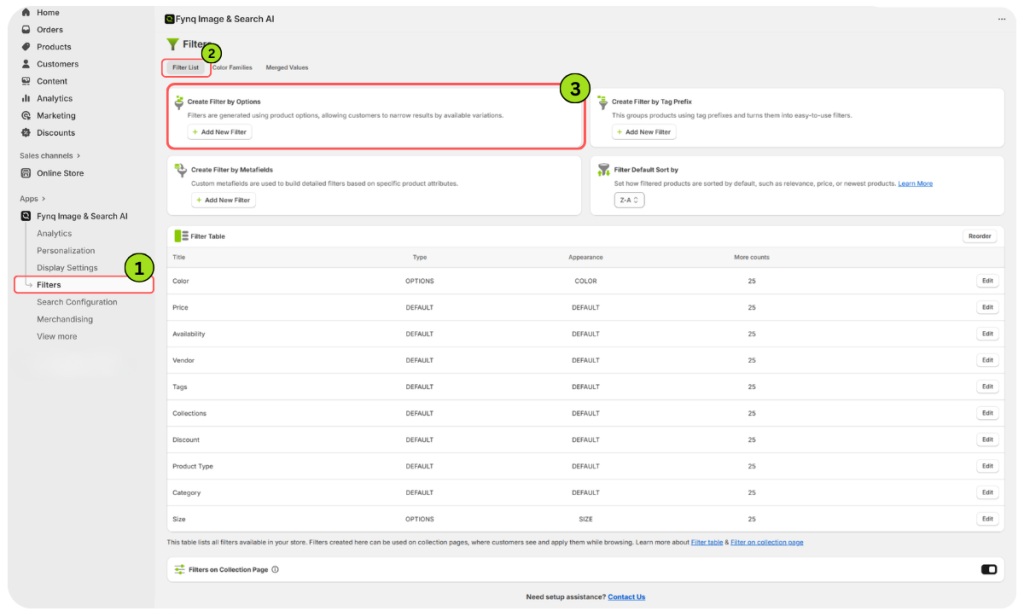
This section lets you add filters based on the product option names (like Size or Color). These filters will then show up in your storefront’s filter sidebar or search interface.
How to Add a Product Option Filter
After clicking Add Filter under “Create Filter by Options,” you’ll land on a new page where you can enter all the needed details.
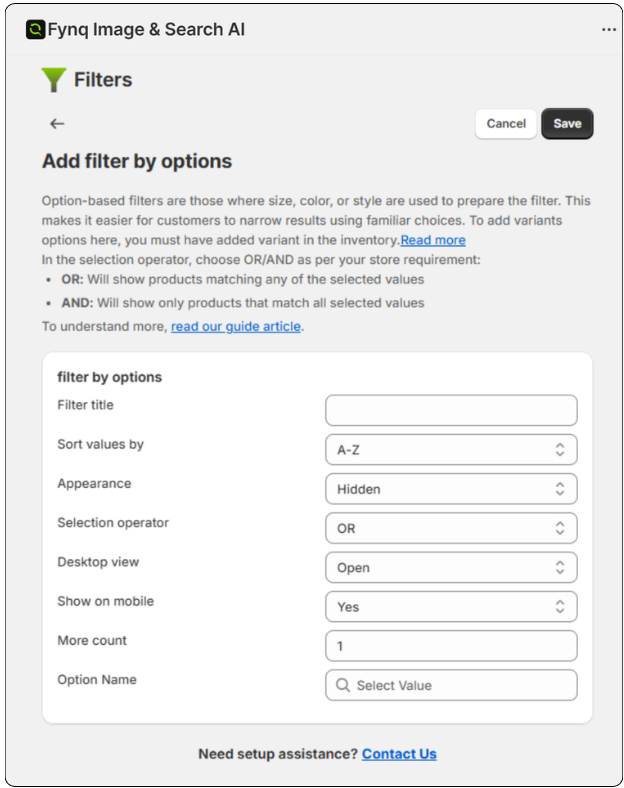
Let’s go over what each field means:
1. Filter Title
This is the name your shoppers will see. Keep it clear and relevant, like “Size” or “Color”.
2. Sort Values By
Choose how the filter options will be arranged:
- A-Z: Alphabetical from A to Z
- Z-A: Alphabetical from Z to A
- Number of Items: Most stocked items appear first
- Default: Keeps the order as-is, as you prefer.
Note: You can edit this Default section by going: Filters > Filter List> Filter Default Sort by> Select the option you want to be the default now onwards.
3. Appearance
Choose how you want the filter to visually appear:
- Hidden: Doesn’t show on the front end
- Color: Appears as the filter values, like color swatches
- Size: Appears to be the filter values like size
- Default: Just a regular filter dropdown or checklist
4. Selection Operator
Controls how multiple filter values behave:
- OR: Will show products matching any of the selected values
- AND: Will show only products that match all selected values
What do “OR” and “AND” mean in a filter?
Think of the Selection Operator as the rule that decides how multiple values in a filter work together. In Fynq, you can choose between OR and AND.
Let’s say you run a clothing store and sell shirts in various colors.
- If you select OR, and a shopper checks Red and Black under the Color filter, the results will include:
- Shirts that are only red,
- Shirts that are only black,
- Shirts that are red and black (maybe in patterns or multiple variants)
- But if you select AND, the results will only show:
- Shirts that have both red and black as available options (in a single product listing)
This makes a big difference in what your shoppers see.
“OR” usually shows more results, giving shoppers more choices and variations they might be interested in. It’s often the better pick for wider discovery, especially in fashion and lifestyle categories.
5. Desktop View
Set how the filter appears by default on desktop:
- Default: Uses theme-based behavior
- Open: Filter is open when the page loads
- Closed: Filter options (not the entire section) are collapsed when the page loads
Note: If you want to collapse or hide the entire filter section, you can do that by going to: Fynq app > Configuration > Search Result Page > Filter Position Layout > Select Left Side Collapsible/ Hide Filter
6. Show on Mobile
Choose whether this filter should appear on mobile view:
- Yes: It will show
- No: It will stay hidden
7. More Count
This sets how many filter values appear before a “More” link shows up. For example, if you set it to 5, only the first five options will be shown at first glance.
8. Option Name
This is the most important step. Start typing the option name (like “Size” or “Color”) that already exists in your Shopify products. Fynq will fetch matching options from your catalog. Select the one you want to base your filter on.
Don’t Forget to Save
Once you’ve filled everything out, click the Save button at the top of the page. Otherwise, your filter won’t show up on the storefront.
NB: Adding Product Options in Shopify
Not finding the product option you need? Here’s how to add one:
- Go to your Shopify Admin Panel
- Click the Products tab
- Open a product where you want to add options
- Scroll down to Variants, and click Add another option
- Name the option (like “Size”) and enter the values (like “Small, Medium, Large”)
- Save the product
Once added, come back to Fynq and restart from Step 8 above to build your filter. Read the Shopify guide to add variants to products.
Wrap-up: Clean Filters Make Faster Sales
Product option filters make life easier for shoppers and increase the chances of a sale. Whether it’s finding the right shoe size or selecting the perfect color, filters remove friction from the buying process.
Start with your best-selling categories. Add size and color filters first, then expand as needed. Clear filters mean faster finds, and faster finds lead to more conversions.