How to Customize Field Names in the Search Result Page
Do you need to change how labels and messages appear on your store’s search result page?
Fynq lets you edit the names of key fields, buttons, and texts that your customers interact with while viewing search results. This not only makes your storefront feel more personal but also ensures consistency with your store’s tone and language.
In this guide, we’ll show you exactly where to find these text settings and how to customize them.
Where to Find These Settings?
To change field names and placeholder texts for your Search Result Page:
Go to: Fynq Image & Search AI > Translations & Texts > Search Result Page > Field Name section
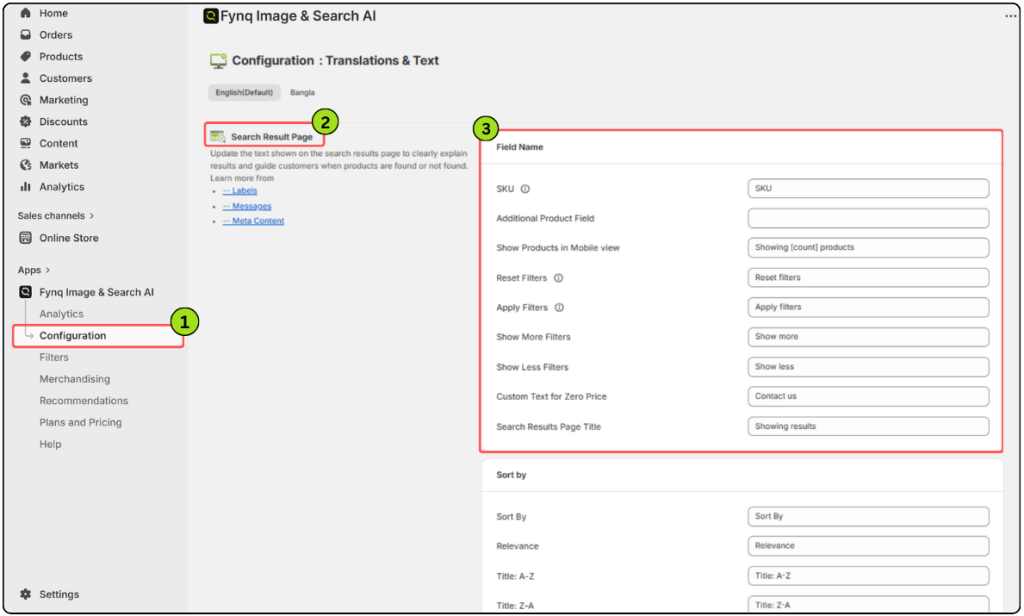
Here, you’ll see editable text boxes linked to different parts of your Search Results Page. Each one comes with a default label, but you can change it to match your store’s language and tone.
Field Names You Can Customize
There are nine different fields you can adjust in this section. Here’s what each one does and how you might want to customize it:
Important!
Before you update any of these labels, make sure the matching fields are turned on in your settings. Go to Configuration > Search result page and check that the relevant options are enabled; otherwise, your changes won’t be visible on the storefront.
1. SKU
This label appears next to the SKU values shown on your search result page. You can rename it to “Item Code” or “Product ID” if that suits your store better.
2. Additional Product Field
By default, this field is blank. You must first choose what kind of data to show here: Vendor, Product Type, Collection, or SKU for all variants.
NB: This field won’t show anything unless enabled from Configuration > Search result page > Products. Once active, return here and set the right label, like “Brand,” “Category,” or “Collection”, based on what you selected earlier.
3. Show Products in Mobile View
This label appears in mobile layouts, letting users know how many products are being shown. You can include the variable [count] to dynamically pull in the total number of products found.
For example:
“Showing [count] items” will become “Showing 34 items” when a user searches. The number of ‘[count]’ is variable.
NB: Do not use any variables except [count] in this field. Other dynamic variables like [search_string] WON’T work here.
4. Reset Filters
This is the button shoppers click to clear all selected filters. You can change the text to “Clear All” or “Start Over”.
5. Apply Filters
This button appears when customers choose filter options. You might want to rename it “Update Results” or “Show Matching Products”, depending on your tone.
6. Show More Filters
This label appears when customers want to expand filter options. You can change it to “View All Filters” or “See More Choices”.
7. Show Less Filters
This appears when the full filter list is expanded, and the customer can collapse it. Rename it to something like “Collapse Filters” if you prefer.
8. Custom Text for Zero Price
This is what shoppers see when a product has no price listed. Good examples might be “Contact for Pricing” or “Price Not Available”.

NB:
For complete instructions on handling zero-priced or hidden products on the Search Result Page, check out this article: How to Handle Zero-Priced Products on the Search Results Page
9. Search Result Page Title
This is the main title that appears above your search results. You can keep it simple, like “Search Results”, or use a more personal message, such as “We Found These for You”.
Final Thoughts
Customizing the field names and placeholder texts on your Search Result Page helps you create a smoother, branded shopping experience. Every word your customer sees can influence their comfort and confidence while browsing.
Take a few minutes to review these fields and adjust them to reflect your store’s voice. A few thoughtful updates here can go a long way in making your search results feel more polished, helpful, and trustworthy.