How to Create Custom Filters Using Product Metafields in Fynq
If you’re selling products with unique details, like fabric type, fragrance notes, warranty info, or style codes, you probably want those to appear as filter options in your storefront’s search results. That’s where metafield-based filters come in.
In this guide, we’ll walk you through how to create filters using product metafields in Fynq. It’s quick, straightforward, and helps your customers find what they need faster.
Where to Find It: Creating Metafield Filters in Fynq
To create filters using metafields, go to:
Fynq Image & Search AI → Filter → Filter List → Create Filter by Metafields → Add New Filter
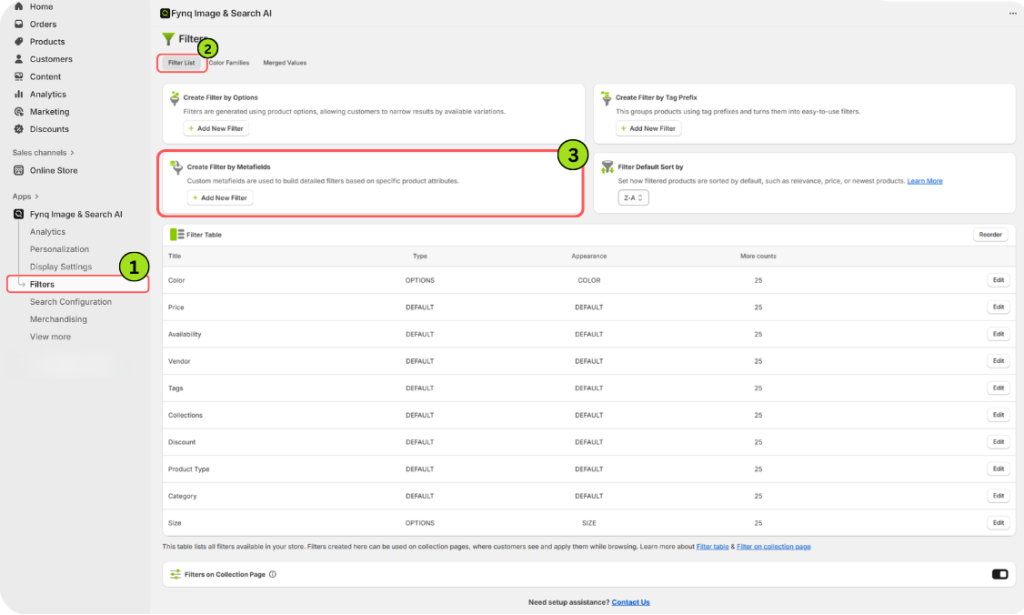
This is where you’ll generate custom filters based on existing metafields in your products or categories. These filters will appear on the search result page for better product discovery.
Steps to Create a Metafield-Based Filter
Once you’re inside the Create Filter by Metafields section, click on the Add New Filter button. This will open a form where you’ll enter all the necessary details. Below is a breakdown of each field and what it does.
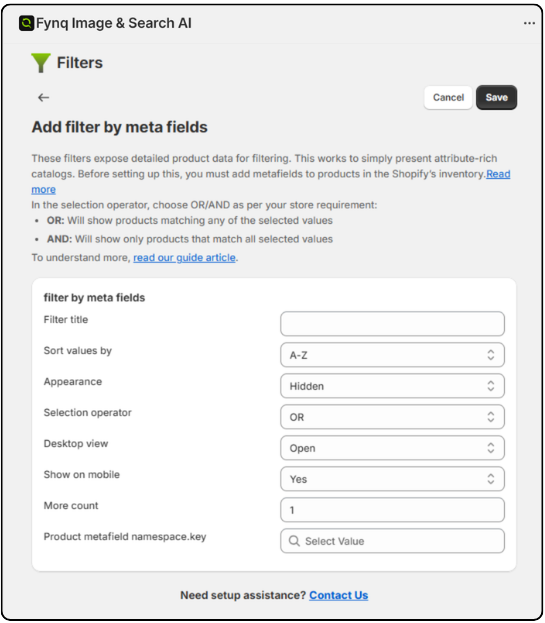
1. Filter Title
- Enter the name you want to show in your storefront filter.
- Example: “Material,” “Flavor,” or “Lens Type.”
- This is what your customers will see in the filter list.
2. Sort Values By
- Choose how the filter values should appear to users.
- Options:
- A-Z – Sort alphabetically from A to Z
- Z-A – Sort alphabetically from Z to A
- Number of Items – Sort by how many products are in each value
- Default – Use the order as stored
Tip: Use A-Z for simple readability or the Number of Items to highlight popular options.
3. Appearance
Choose how the filter looks visually.
Options:
- Default – Standard list style
- Color – Color swatches (great for variants like red, blue, black)
- Size – Box style, perfect for clothing sizes
- Hidden – The filter won’t show on the storefront, but stays active in the background, filtering
Tip: If you’re filtering by color or size, choose those appearances for a better user experience.
4. Selection Operator
This controls how multiple values work together.
Options:
- OR – Shows products that match any selected value
- AND – Shows products that match all selected values
What do “OR” and “AND” mean in a filter?
Think of the Selection Operator as the rule that decides how multiple values in a filter work together. In Fynq, you can choose between OR and AND.
Let’s say you run a clothing store and sell shirts in various colors.
- If you select OR, and a shopper checks Red and Black under the Color filter, the results will include:
- Shirts that are only red,
- Shirts that are only black,
- Shirts that are red and black (maybe in patterns or multiple variants)
- But if you select AND, the results will only show:
- Shirts that have both red and black as available options (in a single product listing)
This makes a big difference in what your shoppers see.
“OR” usually shows more results, giving shoppers more choices and variations they might be interested in. It’s often the better pick for wider discovery, especially in fashion and lifestyle categories.
5. Desktop View
Choose the default state of the filter on desktop screens.
Options:
- Default – Based on Fynq settings
- Open – Filter stays expanded by default
- Closed – Filter stays collapsed until clicked
Tip: Set frequent-use filters (like Category or Size) to Open. Otherwise, you can close for a clear look.
6. Show on Mobile
Choose whether this filter appears on mobile view.
Options:
- Yes – Show this filter on mobile
- No – Hide it on mobile
7. More Count
Enter a number. After this count, the filter shows a “more” button.
Example: If set to 5, only 5 values show at first, with a “Show More” option.
Tip: Keep your filter list clean and focused.
8. Product Metafield Namespace.key
This is the most important step. Click the field and start typing. Fynq will suggest from the metafields already added to your products or categories.
Choose the one that matches the custom data you want to filter.
Tip: The value here must match metafields already defined in your Shopify admin. If you haven’t added any yet, follow the next section.
Reminder: Don’t forget to save
After filling out all the fields, scroll to the top of the page and click Save. Filters won’t show up on your storefront until they’re saved.
How to Add Metafields in Shopify (If You Haven’t Yet)
Before Step 8 can work, you must already have metafields set up in your Shopify store. Here’s how:
- Go to your Shopify Admin
- Click Settings
- Select Metafields and metaobjects
- Choose Products
- Click Add Definition
Define the metafield with a name, namespace, and key. Make sure it’s assigned to the products where the filter will apply.
Need more help for Metafields? You can always check Shopify’s official guide for Metafields.
Once defined and filled in for your products, return to Step 8 above and use them in your Fynq filters.
Conclusion: Use Metafields to Create Filters That Truly Fit Your Store
Creating filters with metafields helps you control exactly what shoppers can filter by. Whether it’s scent, cut, warranty, or any other custom attribute, metafield filters let your storefront work like a tailored experience.
Set it up once, and let customers find what they want faster.